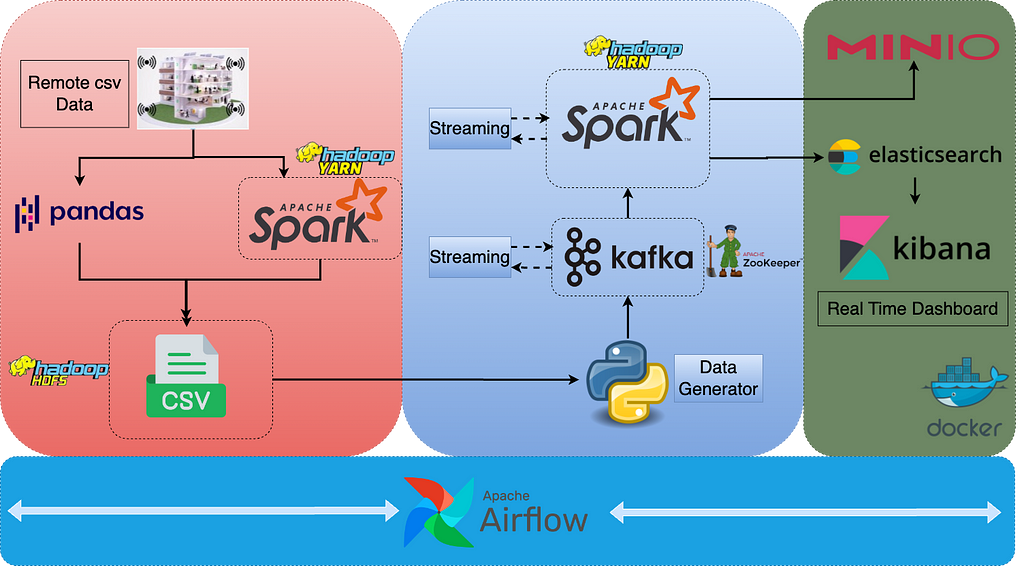
Data Engineering End-to-End Project — Part 2 — Spark, Kafka, Elasticsearch, Kibana, MinIO, Docker, Airflow, Hadoop YARN, HDFS, Zookeeper, Pandas
You may find the first part of the project in the below article.
Data Engineering End-to-End Project — Part 1 — Spark, Kafka, Elasticsearch, Kibana, MinIO, Docker…
Writing Data to Elasticsearch using Spark Streaming
You may see the details for this section below. In this section, we will go through the code blocks.
Apache Spark Structured Streaming and Elasticsearch
The first thing is to run the docker-compose file and get Elasticsearch and Kibana up and running.
version: '3.8'
services:
  es:
    image: docker.elastic.co/elasticsearch/elasticsearch:7.9.0
    container_name: es
    environment:
      - node.name=es
      - cluster.name=es-docker-single
      - discovery.seed_hosts=es
      - cluster.initial_master_nodes=es
      - bootstrap.memory_lock=true
      - "ES_JAVA_OPTS=-Xms1024m -Xmx1024m"
    ulimits:
      memlock:
        soft: -1
        hard: -1
    volumes:
      - data:/usr/share/elasticsearch/data
    ports:
      - 9200:9200
    networks:
      - elastic

  kib:
    image: docker.elastic.co/kibana/kibana:7.9.0
    depends_on:
      - es
    container_name: kib
    ports:
      - 5601:5601
    environment:
      ELASTICSEARCH_URL: <http://es:9200>
      ELASTICSEARCH_HOSTS: <http://es:9200>
    networks:
      - elastic
volumes:
  data:
    driver: local
networks:
  my_docker:
  elastic:
    driver: bridge
We can access Elasticsearch UI via localhost:5601. All the methods and operations are described with comments and docstrings in spark_to_elasticsearch.py.
We should first import the necessary libraries and define the global variables.
import sys
import warnings
import traceback
import logging

logging.basicConfig(level=logging.INFO,
                    format='%(asctime)s:%(funcName)s:%(levelname)s:%(message)s') # One can see the logs to understand possible errors better. Log levels were determined due to method importance.

warnings.filterwarnings('ignore')
checkpointDir = "file:///tmp/streaming/kafka_office_input" # Historical data is kept here. Can be deleted after each run for development purposes.

# Below creates the format for office_input index.
office_input_index = {
    "settings": {
        "index": {
            "analysis": {
                "analyzer": {
                    "custom_analyzer":
                        {
                            "type": "custom",
                            "tokenizer": "standard",
                            "filter": [
                                "lowercase", "custom_edge_ngram", "asciifolding"
                            ]
                        }
                },
                "filter": {
                    "custom_edge_ngram": {
                        "type": "edge_ngram",
                        "min_gram": 2,
                        "max_gram": 10
                    }
                }
            }
        }
    },
    "mappings": {
        "properties": {
            "event_ts_min": {"type": "date",
            "format": "yyyy-MM-d hh:mm:ss||yyyy-MM-dd hh:mm:ss||yyyy-MM-dd HH:mm:ss||yyyy-MM-d HH:mm:ss",
            "ignore_malformed": "true"
      },
            "co2": {"type": "float"},
            "humidity": {"type": "float"},
            "light": {"type": "float"},
            "temperature": {"type": "float"},
            "room": {"type": "keyword"},
            "pir": {"type": "float"},
            "if_movement": {"type": "keyword"}

        }
    }
}
We should create the Spark Session first with the necessary jar files. All the details about the jar files are explained in the above-mentioned article.
def create_spark_session():
    """
    Creates the Spark Session with suitable configs.
    """
    from pyspark.sql import SparkSession
    try:
        # Spark session is established with elasticsearch and kafka jars. Suitable versions can be found in Maven repository.
        spark = (SparkSession.builder
                 .appName("Streaming Kafka-Spark")
                 .config("spark.jars.packages", "org.elasticsearch:elasticsearch-spark-30_2.12:7.12.0,org.apache.spark:spark-sql-kafka-0-10_2.12:3.0.0")
                 .config("spark.driver.memory", "2048m")
                 .config("spark.sql.shuffle.partitions", 4)
                 .config("spark.serializer", "org.apache.spark.serializer.KryoSerializer")
                 .getOrCreate())
        logging.info('Spark session created successfully')
    except Exception:
        traceback.print_exc(file=sys.stderr) # To see traceback of the error.
        logging.error("Couldn't create the spark session")

    return spark
Since this script has to read the data coming from the Kafka topic, the below method will read the data and create the initial data frame.
def create_initial_dataframe(spark_session):
    """
    Reads the streaming data and creates the initial dataframe accordingly.
    """
    try:
        # Gets the streaming data from topic office_input.
        df = spark_session \\
          .readStream \\
          .format("kafka") \\
          .option("kafka.bootstrap.servers", "localhost:9092") \\
          .option("subscribe", "office_input") \\
          .load()
        logging.info("Initial dataframe created successfully")
    except Exception as e:
        logging.warning(f"Initial dataframe couldn't be created due to exception: {e}")

    return df
We have to modify the initial data frame and should configure it so that it is compatible with Spark.
def create_final_dataframe(df, spark_session):
    """
    Modifies the initial dataframe, and creates the final dataframe.
    """
    from pyspark.sql.types import IntegerType, FloatType, StringType
    from pyspark.sql import functions as F
    df2 = df.selectExpr("CAST(value AS STRING)") # Get only the value part of the topic message.

    df3 = df2.withColumn("ts_min_bignt", F.split(F.col("value"), ",")[0].cast(IntegerType())) \\
        .withColumn("co2", F.split(F.col("value"), ",")[1].cast(FloatType())) \\
        .withColumn("humidity", F.split(F.col("value"), ",")[2].cast(FloatType())) \\
        .withColumn("light", F.split(F.col("value"), ",")[3].cast(FloatType())) \\
        .withColumn("pir", F.split(F.col("value"), ",")[4].cast(FloatType())) \\
        .withColumn("temperature", F.split(F.col("value"), ",")[5].cast(FloatType())) \\
        .withColumn("room", F.split(F.col("value"), ",")[6].cast(StringType())) \\
        .withColumn("event_ts_min", F.split(F.col("value"), ",")[7].cast(StringType())) \\
        .drop(F.col("value")) # Define data types of all columns.

    df3.createOrReplaceTempView("df3")

    # Below adds the if_movement column. This column shows the situation of the movement depending on the pir column.
    df4 = spark_session.sql("""
    select
      event_ts_min,
      co2,
      humidity,
      light,
      temperature,
      room,
      pir,
      case
        when pir > 0 then 'movement'
        else 'no_movement'
      end as if_movement
    from df3

    """)
    logging.info("Final dataframe created successfully")
    return df4
We should establish the Elasticsearch connection and check if the index exists or not.
def create_elasticsearch_connection():
    """
    Creates the ES connection.
    """
    from elasticsearch import Elasticsearch
    try:
        es = Elasticsearch("<http://localhost:9200>")
        logging.info(f"Connection {es} created succesfully") # Prints the connection details.
    except Exception as e:
        traceback.print_exc(file=sys.stderr)
        logging.error("Couldn't create the final dataframe")

    return es

def check_if_index_exists(es):
    """
    Checks if index office_input exists. If not, creates it and prints message accordingly.
    """
    if es.indices.exists(index="office_input"):
        print("Index office_input already exists")
        logging.info("Index office_input already exists")
    else:
        es.indices.create(index="office_input", body=office_input_index)
        print("Index office_input created")
        logging.info("Index office_input created")
In the end, we will be sending the streaming data into the Elasticsearch index.
def start_streaming(df, es):
    """
    Starts the streaming to index office_input in elasticsearch.
    """
    logging.info("Streaming is being started...")
    my_query = (df.writeStream
                   .format("org.elasticsearch.spark.sql")
                   .outputMode("append")
                   .option("es.nodes", "localhost")
                   .option("es.port", "9200")
                   .option("es.resource", "office_input/_doc")
                   .option("checkpointLocation", checkpointDir)
                   .start())

    return my_query.awaitTermination()
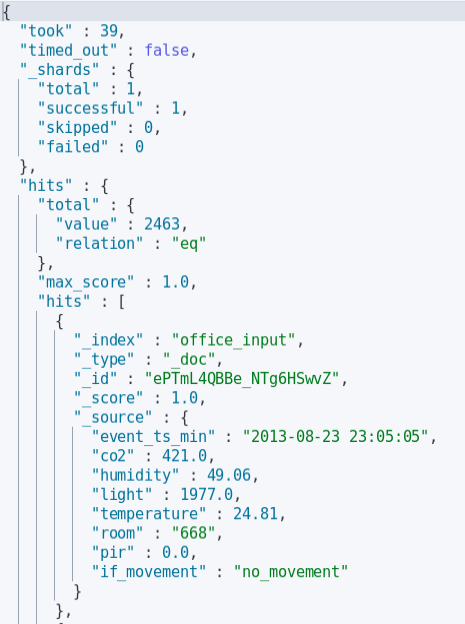
Sample Elasticsearch data:
We can run this script by running spark_to_elasticsearch.sh. All the bash scripts will be running as tasks inside the Airflow DAG. This script also runs the Spark virtualenv.
#!/usr/bin/env bash

set -e
source /home/train/venvspark/bin/activate
python /home/train/PycharmProjects/spark_to_elasticsearch/spark_to_elasticsearch.py
Logs of the script:

Writing data to MinIO using Spark Streaming
You may see the details for this section below. In this section, we will go through the code blocks.
Apache Spark Structured Streaming and MinIO
First of all, we have to create a Docker container for MinIO.
version: '3.8'
services:
  minio:
    container_name: minio
    image: "minio/minio:RELEASE.2021-10-13T00-23-17Z"
    volumes:
      - minio:/data
    ports:
      - "9000:9000"
      - "9001:9001"
    networks:
      - my_docker
    environment:
      MINIO_ACCESS_KEY: "root"
      MINIO_SECRET_KEY: "root12345"
    command: server /data --console-address ":9001"
    healthcheck:
      test: [ "CMD", "curl", "-f", "<http://127.0.0.1:9000/minio/health/live>" ]
      interval: 30s
      timeout: 20s
      retries: 3
volumes:
  minio:
networks:
  my_docker:
We can access MinIO UI via localhost:9001. All the methods and operations are described with comments and docstrings in spark_to_minio.py.
We have to create the Spark Session first with the necessary jar files. Jar-related information is given in the above article.
def create_spark_session():
    """
    Creates the Spark Session with suitable configs.
    """
    from pyspark.sql import SparkSession
    try:
        # Spark session is established with kafka jar. Suitable versions can be found in Maven repository.
        spark = (SparkSession.builder
                 .appName("Streaming Kafka Example")
                 .config("spark.jars.packages", "org.apache.spark:spark-sql-kafka-0-10_2.12:3.0.0")
                 .getOrCreate())
        logging.info('Spark session successfully created')
    except Exception as e:
        traceback.print_exc(file=sys.stderr) # To see traceback of the error.
        logging.error(f"Couldn't create the spark session due to exception: {e}")

    return spark
Since MinIO is an S3-compatible object storage, we have to define the AWS credentials and load the credentials so that we will be able to send the data to MinIO.
def read_minio_credentials():
    """
    Gets the MinIO config files from local with configparser.
    """
    import configparser

    config = configparser.RawConfigParser()
    try:
        config.read('/home/train/.aws/credentials')
        config.sections()
        accessKeyId = config.get('minio', 'aws_access_key_id')
        secretAccessKey = config.get('minio', 'aws_secret_access_key')
        logging.info('MinIO credentials is obtained correctly')
    except Exception as e:
        traceback.print_exc(file=sys.stderr)
        logging.error(f"MinIO credentials couldn't be obtained due to exception: {e}")

    return accessKeyId, secretAccessKey

def load_minio_config(spark_context: SparkContext):
    """
    Establishes the necessary configurations to access to MinIO.
    """
    accessKeyId, secretAccessKey = read_minio_credentials()
    try:
        spark_context._jsc.hadoopConfiguration().set("fs.s3a.access.key", accessKeyId)
        spark_context._jsc.hadoopConfiguration().set("fs.s3a.secret.key", secretAccessKey)
        spark_context._jsc.hadoopConfiguration().set("fs.s3a.endpoint", "<http://127.0.0.1:9000>")
        spark_context._jsc.hadoopConfiguration().set("fs.s3a.path.style.access", "true")
        spark_context._jsc.hadoopConfiguration().set("fs.s3a.connection.ssl.enabled", "false")
        spark_context._jsc.hadoopConfiguration().set("fs.s3a.impl", "org.apache.hadoop.fs.s3a.S3AFileSystem")
        logging.info('MinIO configuration is created successfully')
    except Exception as e:
        traceback.print_exc(file=sys.stderr)
        logging.error(f"MinIO config could not be created successfully due to exception: {e}")
Creating the initial data frame and modifying it is pretty much the same as the Elasticsearch part. But now, we will send the streaming data to MinIO.
def start_streaming(df):
    """
    Starts the streaming to index office_input in elasticsearch.
    """
    logging.info("Streaming is being started...")
    stream_query = (df.writeStream
                        .format("csv")
                        .outputMode("append")
                        .option('header', 'true')
                        .option("checkpointLocation", checkpointDir)
                        .option("path", 's3a://my_bucket/office_input') # The bucket my_bucket can be created via UI
                        .start())

    return stream_query.awaitTermination()
We can run this script by running spark_to_minio.sh. This script also runs the Spark virtualenv.
#!/usr/bin/env bash

set -e
source /home/train/venvspark/bin/activate
python3 /home/train/PycharmProjects/spark_to_minio/spark_to_minio.py
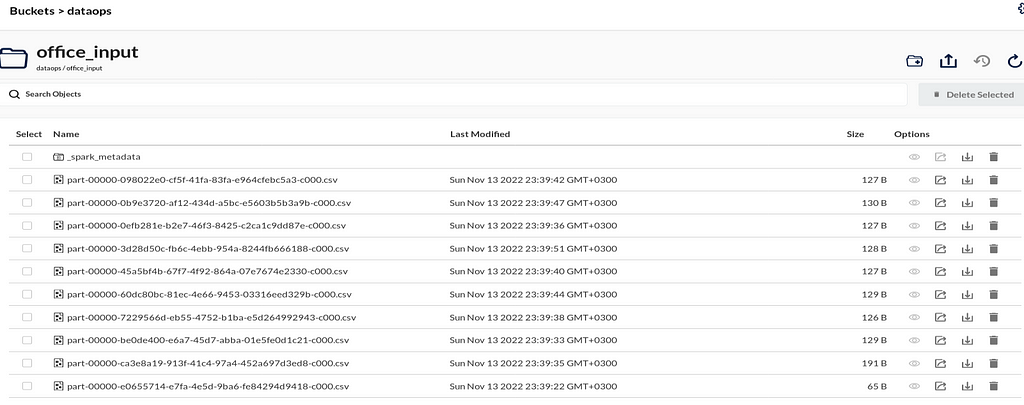
Sample MinIO data:
We can run this script by running spark_to_minio.sh. All the bash scripts will be running as tasks inside the Airflow DAG. This script also runs the Spark virtualenv.
#!/usr/bin/env bash

set -e
source /home/train/venvspark/bin/activate
python3 /home/train/PycharmProjects/spark_to_minio/spark_to_minio.py
NOTE: We can also check the running Spark jobs via localhost:4040
Airflow DAG Trigger
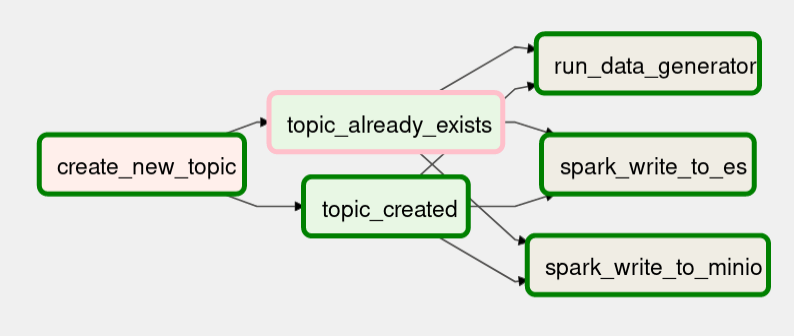
So far, we have created all the necessary Python scripts, bash scripts, DAG scripts, and connections. With this section, all these separate processes come together and will be automated. You can see the task names and they are all explained earlier. The only thing we should do is put the DAG script under the dags folder.
from airflow import DAG
from datetime import datetime, timedelta

from kafka_admin_client.kafka_admin_client import create_new_topic

from airflow.operators.dummy import DummyOperator
from airflow.operators.bash import BashOperator
from airflow.operators.python import BranchPythonOperator

start_date = datetime(2022, 10, 19, 12, 20)

default_args = {
    'owner': 'train',
    'start_date': start_date,
    'retries': 1,
    'retry_delay': timedelta(seconds=5)
}

...
We can trigger the Airflow DAG on localhost:1502. Triggering the DAG will do all the above-explained data pipeline with one click.

Running streaming applications on Airflow may create some issues. In that case, we can run bash scripts instead.
Create a Dashboard on Kibana
We can check the amount of streaming data (and the change of the amount) in Elasticsearch by running the following command.
GET /_cat/indices?v
We can create a new dashboard using the data in the office_input index. If we set the refresh time to 10 seconds or so, we will obtain a real-time dashboard and can monitor all the sensor data. Here are some sample graphs:
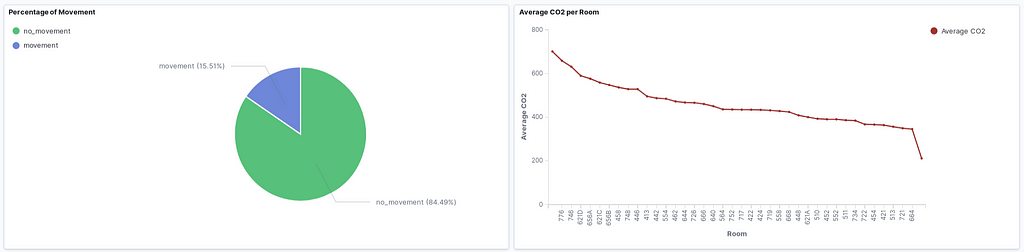
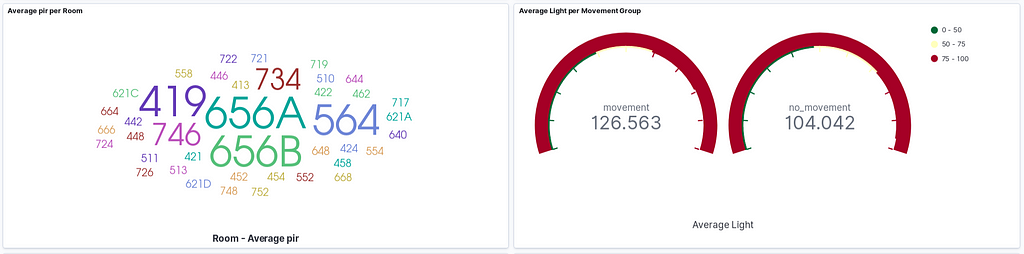
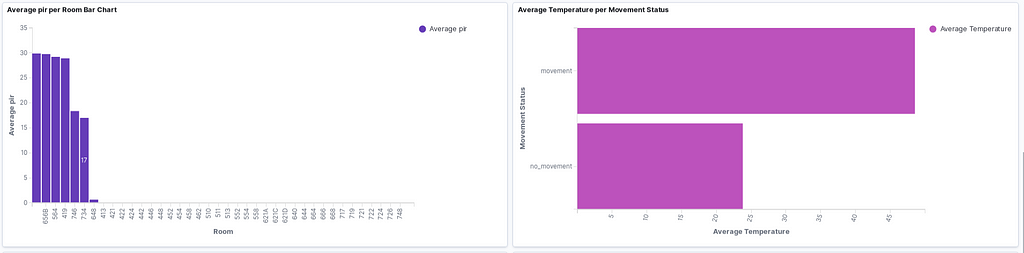
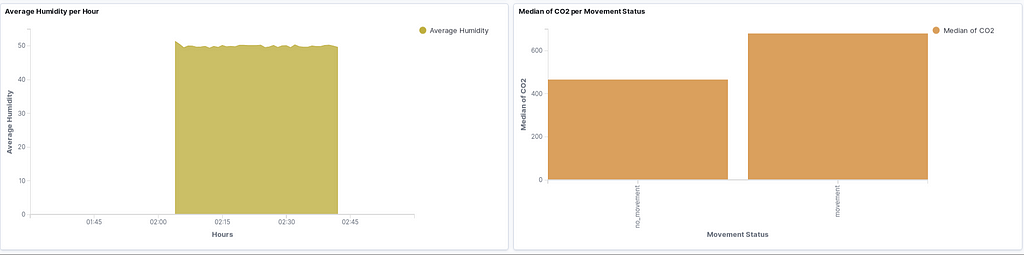
Which contains:
- Percentage of Movement Pie Chart
- Average CO2 per room Line Chart
- Average pir per Room Absolute Value Graph
- Average Light per Movement Status Gauge
- Average pir per Room Bar Chart
- Average Temperature per Movement Bar Chart
- Average Humidity per Hour Area Chart
- The median of CO2 per Movement Status Bar Chart
In this part of the project, we have obtained the streaming data coming to the Kafka topic using Spark Structured Streaming. We have established the connection between Spark and Kafka. After getting the data, we created the initial data frame, modified it and sent both to Elasticsearch and MinIO by configuring the necessary connections. In the end, we created a real-time dashboard with lots of graphs.
If you’re looking for freelance or consultancy work on data pipelines, AI systems, or real-time platforms, reach out to me on X, or via email.
And, if this saved you time or sparked an idea, consider sponsoring me on GitHub. Thank you!
GitHub: https://github.com/dogukannulu
Email: dogukannulu@gmail.com