
Repository
https://github.com/dogukannulu/langgraph-chatbot-tavily-sqlite
Tech Stack
- LangChain
- LangGraph
- Tavily Search
- SQLite
- Black
- Google Gemini
Overview
- As the beginning of this project, we are going first to leverage uv and Makefile to automate processes.
- Then, create a virtual environment and install all requirements.
- Format all scripts with black.
- Create and run environment test script.
- Create and run demo script to call the model.
- Then, we will create LangGraph graph that will work as a chatbot with tool calling.
- We will create nodes, edges and will use conditional routing.
- We will also keep chat memory using SQLite and keep threads IDs there.
Introduction
In this comprehensive guide, we’ll build a sophisticated chatbot using LangGraph that features persistent memory, tool integration, and routing capabilities. Our chatbot will use Google’s Gemini model, integrate with Tavily for web search, maintain conversation history in SQLite, and provide a polished user experience.
Prerequisites and Tools Overview
What is UV?
UV is a modern Python package manager that’s significantly faster than pip. Developed by the creators of Ruff, UV can be 10–100x faster than traditional pip installations. Key benefits include:
- Speed: Ultra-fast package resolution and installation
- Reliability: Better dependency resolution than pip
- Modern: Built with Rust for performance
- Compatible: Drop-in replacement for pip in most cases
UV handles virtual environments, package installation, and dependency management more efficiently than traditional Python tools. We are going to use it for package installation, venv creation and script running.
You may find more information in this repo.
What is a Makefile?
A Makefile is a file containing a set of directives used by the make utility to automate tasks. In Python projects, Makefiles help standardize common development tasks:
- Task Automation: Run complex commands with simple make commands
- Consistency: Ensure all developers use the same commands
- Documentation: Serve as living documentation of common tasks
- Cross-platform: Work across different operating systems
Example: Instead of remembering uv pip install -r requirements.txt, we will simply run make install.
Core Technologies Overview
LangChain
LangChain is a framework for developing applications powered by language models. It provides:
- Chains: Link multiple LLM calls together
- Memory: Maintain conversation context
- Tools: Integrate external APIs and services
- Agents: Create autonomous decision-making systems
LangGraph
LangGraph is LangChain’s library for building stateful, multi-actor applications with LLMs. Key features:
- Graph-based Architecture: Define workflows as directed graphs
- State Management: Persistent state across conversation turns
- Conditional Routing: Dynamic flow control based on conditions
- Checkpoints: Save and restore conversation state
Tavily Search
Tavily is a search API designed specifically for AI applications:
- AI-Optimized: Results formatted for LLM consumption
- Real-time: Access to current web information
- Reliable: High availability and performance
- Easy Integration: Simple API with LangChain support
Now, we can start implementing each step of the project.
Get API Keys
Google API Key (Gemini)
- Visit Google AI Studio: Go to https://aistudio.google.com/app/apikey
- Sign in: Use your Google account
- Create API Key: Click “Create API Key”
- Copy Key: Save the generated key securely in your local
- Set Billing: Ensure billing is enabled for your Google Cloud project
Tavily API Key
- Visit Tavily: Go to https://tavily.com/
- Sign Up: Create an account
- Dashboard: Access your dashboard after verification
- API Keys: Navigate to the API keys section
- Generate Key: Create a new API key and save it securely in your local
- Free Tier: Tavily offers free searches per month
Project Setup
Directory Structure
Let’s start by understanding our project structure:
advanced_chatbot/
├── main.py                          # Main application
├── requirements.txt                 # Dependencies
├── env_template.txt                # Environment template
├── test_development_setup.py       # Setup verification
├── demo_chatbot.py                 # Demo script
├── Makefile                        # Task automation
├── README.md                       # Documentation
├── chatbot.log                     # Generated logs
└── chatbot_checkpoint.db           # Generated database
Installation Process with Makefile
Our project includes a comprehensive Makefile that automates all setup and development tasks. You may run make help to see all commands it has by running make help. Let’s go through the complete setup process:
Step 1: Install UV Package Manager
You may refer to Makefile here.
# Use Makefile to install UV automatically
make install-uv
This command:
- Checks if UV is already installed
- Installs UV using Homebrew if available
- Provides instructions if Homebrew is not found
- Confirms successful installation with version info
Step 2: Create Virtual Environment
# Create virtual environment named 'chatbot'
make create-venv
This creates a new virtual environment called chatbot using UV, which is much faster than traditional python -m venv.
Step 3: Activate Virtual Environment
# Activate the virtual environment (this step cannot be automated by Makefile)
source chatbot/bin/activate
Note: Makefile cannot activate virtual environments directly due to shell limitations, so this must be done manually.
Step 4: Install Dependencies
# Install all project dependencies in requirements.txt
make install
This command:
- Checks if virtual environment is activated
- Uses UV if available (much faster), falls back to pip
- Installs all dependencies from requirements.txt
- Provides helpful error messages if environment isn’t activated
Step 5: Configure Environment Variables
Create a .env file from the template:
cp env_template.txt .env
Edit .env with your API keys:
# Google API Configuration
GOOGLE_API_KEY=your_actual_google_api_key_here
# Tavily Search API Configuration
TAVILY_API_KEY=your_actual_tavily_api_key_here
# Optional configurations
CHECKPOINT_DB_PATH=chatbot_checkpoint.db
LOG_LEVEL=INFO
LOG_FILE=chatbot.log
Dependencies Analysis
Let’s examine our requirements.txt:
# Core LangChain and LangGraph dependencies
langchain>=0.3.0                    # Main framework
langchain-google-genai>=2.0.0       # Google Gemini integration
langchain-community>=0.3.0          # Community tools
langgraph>=0.2.0                    # Graph workflows
langgraph-checkpoint-sqlite>=0.1.0  # SQLite persistence
# Search and web tools
langchain-tavily>=0.1.0             # Web search
# Environment and configuration
python-dotenv>=1.0.0                # Environment variables
# Additional utilities
beautifulsoup4>=4.12.0              # HTML parsing
requests>=2.31.0                    # HTTP requests
# Development tools
black>=24.0.0                       # Code formatting
Development Workflow with Makefile
As the next step, you may create your own project files by obtaining them from the repo. Now, we are going to format all the scripts existing in our project.
Install Development Tools
# Install development dependencies (to format all our scripts)
make dev-install
This installs additional tool black for code formatting.
Code Formatting
# Auto-format all Python code with black
make format
Testing Setup
# Run setup verification tests
make test
This runs test_development_setup.py which verifies:
- All imports work correctly
- Environment configuration is proper
- Database connections function
- Main script components load successfully
So far, we created and activated our virtual environment, installed all requirements, formatted our code and tested imports. Now, we will move on with main chatbot application with Langchain/LangGraph
Core Implementation
State Management Design
Our chatbot uses a TypedDict to define its state structure. We are going to use this class for the state structure of our chatbot.
from typing import Annotated, Dict, Any
from typing_extensions import TypedDict
from langgraph.graph.message import add_messages

class State(TypedDict):
    """
    State structure for our chatbot.

    Key Features:
    - messages: Conversation history with automatic message addition
    - session_info: Metadata and statistics
    - thread_id: Unique identifier for memory persistence
    """
    messages: Annotated[list, add_messages]  # Auto-manages message history
    session_info: Dict[str, Any]             # Session metadata
    thread_id: str                           # Memory persistence key
Key Design Decisions:
- Annotated Messages: The add_messages annotation automatically handles message list management
- Session Info: Tracks statistics like message count and tool usage. We are also going to log all this information
- Thread ID: Enables conversation persistence across sessions. By using thread ID, we will be able to continue our chats with chat memory.
Logging System
We should implement a comprehensive logging since we would like to see the AI response, total message count, thread ID, whether tool was called per prompt or not, etc.
class ColoredFormatter(logging.Formatter):
    """Custom colored formatter for better log readability."""

    COLORS = {
        'DEBUG': '\033[36m',    # Cyan
        'INFO': '\033[32m',     # Green
        'WARNING': '\033[33m',  # Yellow
        'ERROR': '\033[31m',    # Red
        'CRITICAL': '\033[35m', # Magenta
    }
    RESET = '\033[0m'

    def format(self, record):
        log_color = self.COLORS.get(record.levelname, self.RESET)
        record.levelname = f"{log_color}{record.levelname}{self.RESET}"
        return super().format(record)

    def setup_logging():
        """Setup enhanced logging with file and console handlers."""
        logger = logging.getLogger(__name__)
        logger.setLevel(logging.INFO)

        # File handler for persistent logs
        file_handler = logging.FileHandler("chatbot.log")
        file_formatter = logging.Formatter(
            "%(asctime)s | %(name)s | %(levelname)s | %(funcName)s:%(lineno)d | %(message)s"
        )
        file_handler.setFormatter(file_formatter)

        # Console handler with colors
        console_handler = logging.StreamHandler()
        console_formatter = ColoredFormatter(
            "%(asctime)s | %(levelname)s | %(funcName)s | %(message)s",
            datefmt="%H:%M:%S"
        )
        console_handler.setFormatter(console_formatter)

        logger.addHandler(file_handler)
        logger.addHandler(console_handler)

        return logger
Logging Features:
- Dual Output: Both file and console logging (file logging inside chatbot.log)
- Color Coding: Different colors for different log levels for better visibility
- Detailed Format: Includes timestamp, function name, and line number
- Structured Tracking: Every operation is logged for debugging
LLM Initialization
We initialize Google’s Gemini 2.5 Flash model. The reason of using this model is about the pricing and the responses are still satisfactory.
def initialize_llm():
    """Initialize the LLM with comprehensive error handling."""
    logger.info("Initializing Google Gemini 2.5 Flash model...")

    api_key = os.getenv("GOOGLE_API_KEY")
    if not api_key:
        logger.error("GOOGLE_API_KEY not found in environment variables")
        raise ValueError("GOOGLE_API_KEY not found")

    try:
        llm = init_chat_model(
            "gemini-2.5-flash",
            model_provider="google_genai",
            api_key=api_key,
            temperature=0.7  # Balanced creativity and consistency
        )
        logger.info("Successfully initialized Google Gemini 2.5 Flash model")
        return llm
    except Exception as e:
        logger.error(f"Failed to initialize LLM: {str(e)}")
        raise
Key Features:
- Environment Validation: Checks for API key presence
- Error Handling: Graceful failure with detailed logging
- Configuration: Temperature set to 0.7 for balanced responses including both creativity and consistency
Tool Integration
Our chatbot integrates Tavily search as an optional tool. Afterwards, we are going to leverage conditional routing. If the answer requires model to search web , it is going to fork into tool calling and chatbot will use Tavily search.
def initialize_tools():
    """Initialize tools with enhanced logging."""
    logger.info("Initializing available tools...")
    tools = []

    # Add Tavily search tool if API key is available
    tavily_api_key = os.getenv("TAVILY_API_KEY")
    if tavily_api_key:
        try:
            search_tool = TavilySearch(
                max_results=3,
                description="Search the web for current information, news, and real-time data. Use this when you need up-to-date information that you don't have in your training data.",
            )
            tools.append(search_tool)
            logger.info("Successfully added Tavily search tool")
        except Exception as e:
            logger.error(f"Failed to initialize Tavily search: {str(e)}")
    else:
        logger.warning("TAVILY_API_KEY not found - web search functionality disabled")

    logger.info(f"Tool initialization complete. Available tools: {len(tools)}")
    return tools
Tool Features:
- Optional Integration: Functions with or without Tavily API key
- Smart Configuration: Limited to 3 results for concise responses
- Descriptive: Clear description helps LLM decide when to use
- Graceful Degradation: Works even if search is unavailable
Graph Architecture Deep Dive
Node Implementation
Statistics Update Node
We are going to keep the statistics of the chat using this node. With every new message, the stats are updated and we also log those into the console as well as the log file.
def update_session_stats(state: State):
    """Update session statistics and user profile."""
    logger.debug("Updating session statistics...")

    # Initialize or update session info
    session_info = state.get("session_info", {})
    if "message_count" not in session_info:
        session_info["start_time"] = datetime.now().isoformat()
        session_info["message_count"] = 0
        session_info["tool_usage_count"] = 0

    session_info["message_count"] += 1
    session_info["last_activity"] = datetime.now().isoformat()

    # Count tool usage in recent messages
    messages = state.get("messages", [])
    if messages:
        last_message = messages[-1]
        if hasattr(last_message, 'tool_calls') and last_message.tool_calls:
            session_info["tool_usage_count"] += len(last_message.tool_calls)

    return {"session_info": session_info}
Main Chatbot Node
We use this node as the main chatbot. This node is going to receive the Human prompt and provide the response accordingly.
def chatbot_node(state: State):
    """Main chatbot processing node with enhanced error handling."""
    logger.info("Processing user message through chatbot node...")

    try:
        # Generate dynamic system prompt
        system_prompt = get_system_prompt(state)

        # Prepare messages for LLM
        messages = [SystemMessage(content=system_prompt)] + state["messages"]

        # Get LLM response
        response = llm_with_tools.invoke(messages)

        # Log response details
        if hasattr(response, 'tool_calls') and response.tool_calls:
            tool_names = [tc.get("name", "unknown") for tc in response.tool_calls]
            logger.info(f"LLM requested tool usage: {', '.join(tool_names)}")

        return {"messages": [response]}

    except Exception as e:
        logger.error(f"Error in chatbot_node: {str(e)}")
        error_response = AIMessage(
            content="I apologize, but I encountered an error processing your request."
        )
        return {"messages": [error_response]}
Smart Routing Logic
Using this node, the graph decides whether to use a tool (Tavily) or not. If the tool is required, it is going to look for an answer by searching web.
def should_use_tools(state: State) -> str:
    """Determine if we should route to tools or end the conversation."""
    logger.debug("Evaluating routing decision...")

    messages = state.get("messages", [])
    if not messages:
        return "end"

    last_message = messages[-1]

    # Check if LLM requested tools
    if hasattr(last_message, 'tool_calls') and last_message.tool_calls:
        logger.info(f"Routing to tools - {len(last_message.tool_calls)} tool calls requested")
        return "tools"

    logger.debug("No tools requested, routing to end")
    return "end"
Graph Construction
This is going to be the final step. By using this function, we create the chatbot graph with all of the above nodes included.
def build_chatbot_graph():
    """Build the complete chatbot graph with SQLite persistence."""
    logger.info("Building LangGraph chatbot workflow...")

    # Create StateGraph
    graph_builder = StateGraph(State)

    # Add nodes
    graph_builder.add_node("update_stats", update_session_stats)
    graph_builder.add_node("chatbot", chatbot_node)

    # Add tools node if available
    if tools:
        tool_node = ToolNode(tools)
        graph_builder.add_node("tools", tool_node)

    # Define edges and routing
    graph_builder.add_edge(START, "update_stats")
    graph_builder.add_edge("update_stats", "chatbot")

    # Conditional routing from chatbot
    if tools:
        graph_builder.add_conditional_edges(
            "chatbot",
            should_use_tools,
            {"tools": "tools", "end": END}
        )
        graph_builder.add_edge("tools", "chatbot")
    else:
        graph_builder.add_edge("chatbot", END)

    # Initialize SQLite checkpointer for memory persistence
    db_path = "chatbot_checkpoint.db"
    checkpointer = SqliteSaver(
        sqlite3.connect(db_path, check_same_thread=False)
    )

    # Compile graph
    compiled_graph = graph_builder.compile(checkpointer=checkpointer)
    logger.info("LangGraph workflow compiled successfully")

    return compiled_graph
Graph Flow:
You may see a simple visualization on how the whole graph looks like.
START → update_stats → chatbot → [conditional routing]
                                      ↓
                               tools → chatbot (loop back)
                                      ↓
                                     END
Advanced Features
Dynamic System Prompt Generation
A system prompt is a special instruction given to an AI model before the conversation starts. The purpose is to set the rules, goals, and behavior of the AI throughout the interaction. It will be really useful for the accuracy of the response.
def get_system_prompt(state: State) -> str:
    """Generate context-aware system prompt."""
    session_info = state.get("session_info", {})

    system_prompt = """You are a helpful, knowledgeable, and friendly AI assistant.
      CORE PRINCIPLES:
      - Be conversational and natural in your responses
      - Provide accurate, helpful information
      - Ask clarifying questions when needed
      - Maintain context from our conversation history
      TOOL USAGE:
      - You have access to web search capabilities
      - Use search tools ONLY when you need current information or real-time data
      - If you can answer from your knowledge, do so directly
      - When using tools, briefly explain what you're searching for
      CONVERSATION GUIDELINES:
      - Reference previous parts of our conversation when relevant
      - Be concise but thorough
      - Use a friendly, approachable tone
      - Adapt your explanations to the user's apparent level of understanding
      """

    if session_info.get("message_count", 0) > 1:
        system_prompt += f"\n- This is message #{session_info['message_count']} in our conversation"

    return system_prompt
Memory Persistence with SQLite
Our chatbot uses SQLite checkpoints to maintain conversation memory. With every prompt without providing the thread ID, a new ID will be created and saved into SQLite. Chatbot will display the specific thread ID in the console. We can set it as an argument for chatbot to be able to remember earlier prompts.
# Each conversation has a unique thread_id
thread_id = args.thread or f"chat_{uuid.uuid4().hex[:8]}"
# Configuration for memory persistence
config = {"configurable": {"thread_id": thread_id}}
# Graph execution with memory
result = graph.invoke(inputs, config)
Memory Features:
- Thread-based: Each conversation thread has isolated memory
- Persistent: Conversations survive application restarts
- Automatic: No manual checkpoint management required
- Efficient: SQLite provides fast, reliable storage
Next Steps
Since we went through each step of the main script, we can move forward with next steps to run the scripts.
Running Demo
# Run feature demonstration
make demo
This executes demo_chatbot.py which showcases all key features without requiring user input. It will provide a simple “Hello” as the user input and check if the chatbot script runs properly and provides response.
Cleaning Generated Files
# Clean all generated files (logs, database, cache)
make clean
This removes:
- chatbot.log (log files)
- chatbot_checkpoint.db (SQLite database)
- __pycache__ directories
- .pytest_cache directories
- All .pyc and .pyo files
Running the Chatbot
Since we completed all previous steps, we can run the main script. We have two way of doing this. We can either leverage Makefile again or running commands ourselves.
Makefile:
# Single message mode
# It will provide a single "Hello" message to the model and get an answer
make run

# Interactive conversation mode
# By running this, we can start an interactive chat with a simple "Hello" input
make run-interactive
Terminal Commands:
# Start conversation
uv run main.py --message "Hello"
# You will get the first response
# If you want to keep the chat memory, you can provide the next message with thread
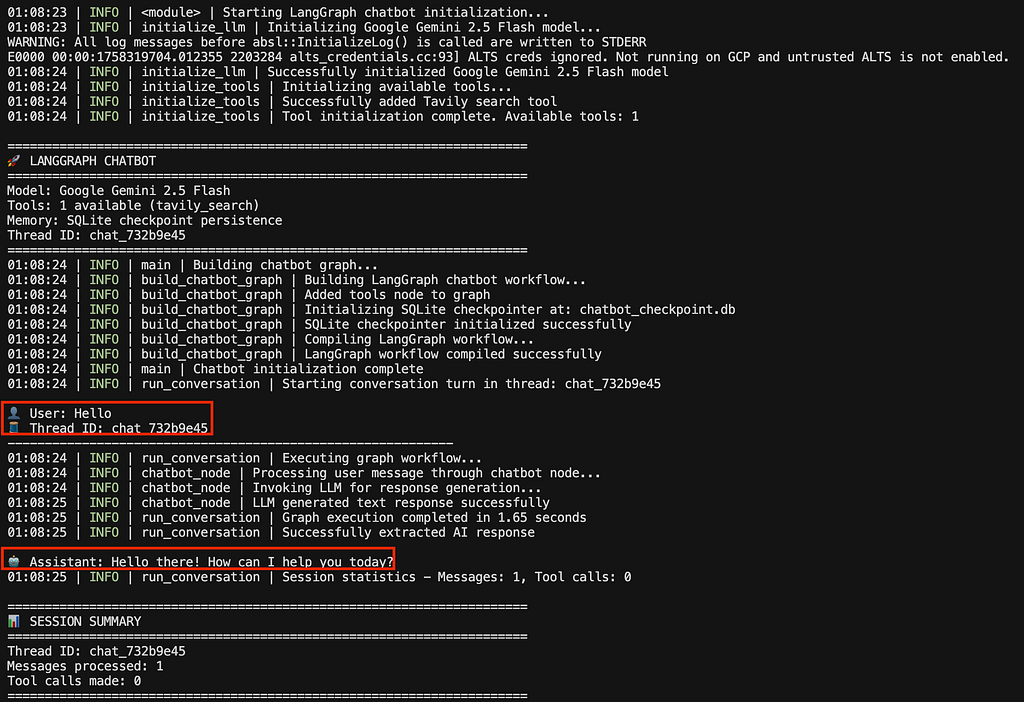
# You may see thread ID in the logs in console or in console.log (see image below)
uv run main.py --thread chat_732b9e45 --message "Next Message"
# Or if you want to start an interactive chat, run this command
# Then, you can keep sending prompts
uv run main.py --message 'Your message' --interactive
Usage Examples
In this last section, we will go through some sample messages.
Single Message Mode
# Using Makefile command
make run
# Or direct Python execution
uv run main.py --message "What's the latest news about AI?"
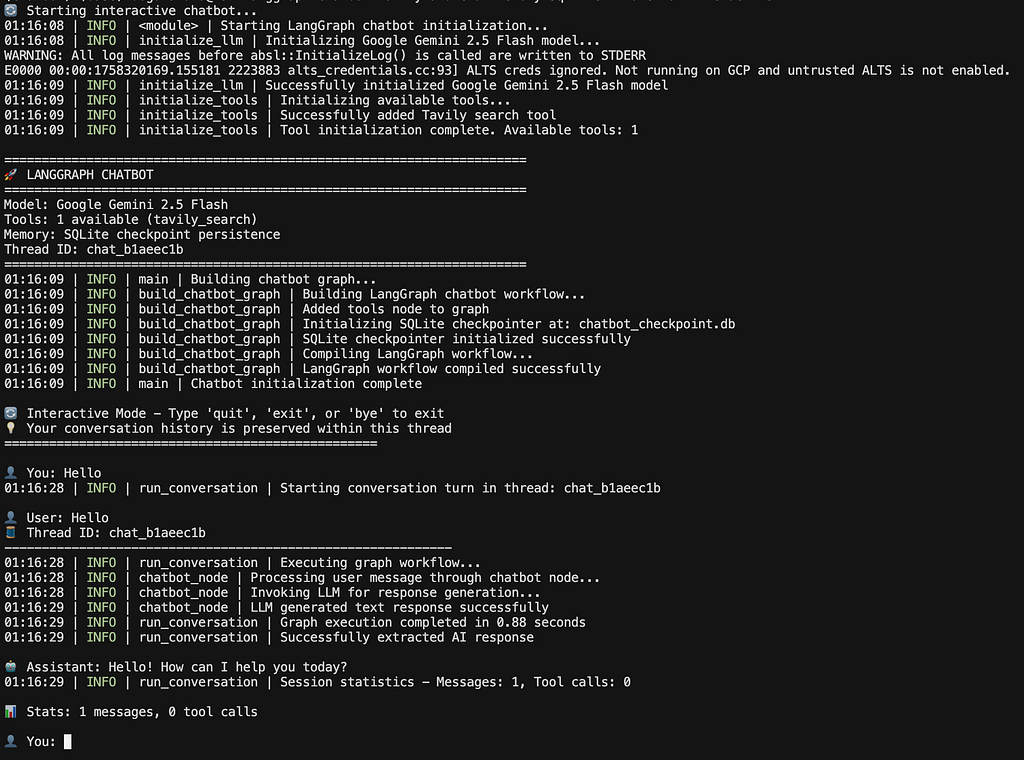
Interactive Mode
# Using Makefile command
make run-interactive
# Or direct Python execution
uv run main.py --message "Hello!" --interactive
Continuing Previous Conversations
# Resume conversation with specific thread ID
uv run main.py --thread abc123 --message "What did we discuss earlier?" --interactive
Debug Mode
# Enable detailed logging
uv run main.py --message "Hello!" --debug --interactive
Conclusion
This LangGraph Chatbot demonstrates modern AI application development with:
- Professional Setup: UV package manager and Makefile automation
- Robust Architecture: Graph-based workflow with conditional routing
- Memory Persistence: SQLite checkpoints for conversation continuity
- Tool Integration: Optional web search capabilities with Tavily
- Production-Ready: Comprehensive logging, error handling, and testing
The modular design makes it easy to extend with additional tools, modify the conversation flow, or integrate with different LLM providers. The comprehensive Makefile ensures consistent development workflows across different environments.
Key Takeaways:
- Makefile Automation: Simplifies complex development workflows
- LangGraph Power: Enables sophisticated conversation flows
- Memory Management: Persistent state enhances user experience with SQLite
- Tool Integration: Extends LLM capabilities with external services (Tavily)
- Production Considerations: Logging, testing, and error handling are crucial
This implementation serves as a solid foundation for building more complex conversational AI applications. We will continue with other applications.
If you’re looking for freelance or consultancy work on data pipelines, AI systems, or real-time platforms, reach out to me on X, or via email.
And, if this saved you time or sparked an idea, consider sponsoring me on GitHub. Thank you!
GitHub: https://github.com/dogukannulu
Email: dogukannulu@gmail.com