
Repository
Tech Stack
- Apache Airflow
- Apache Kafka
- Apache Zookeeper
- Python
- SQL
- API
- MySQL
- Metabase
- Docker
Overview
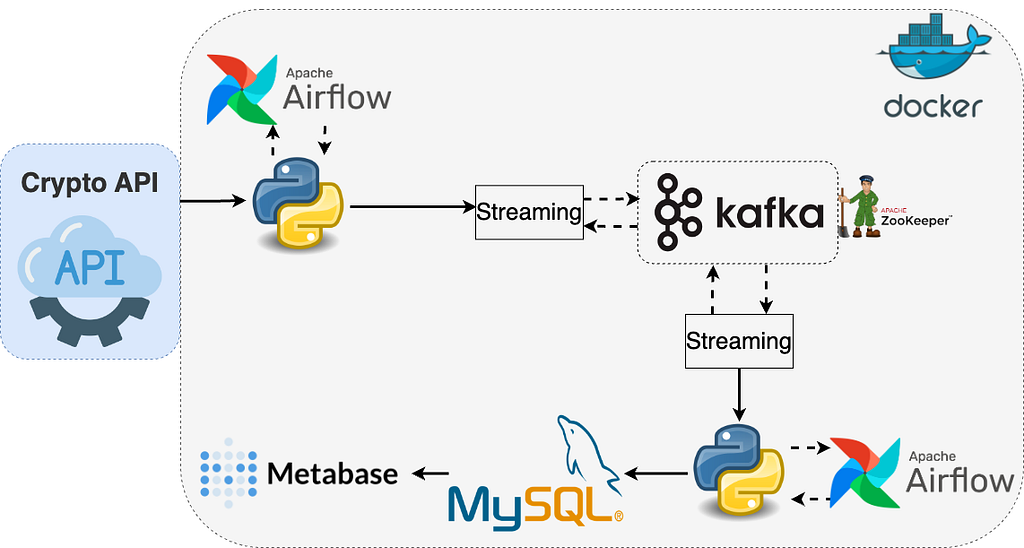
We will be illustrating a streaming data pipeline with this project.
crypto_data_stream.py gets BTC prices from the Crypto API (provided by CoinMarketCap) with an API key. The same script also sends the price-related data to the Kafka topic (producer) every 10 seconds using Airflow for a time period of 3 minutes. We are going to schedule the jobs using Airflow DAGs with crypto_data_stream_dag.py. Once the data is written to Kafka, we will get the data from the Kafka topic (consumer) with read_kafka_write_mysql.py. Once the data is written to the MySQL table, we will connect Metabase to MySQL and create a real-time dashboard in the end.
All services will be running as docker containers. I have connected all containers with each other so that we will be able to write data to Kafka and connect Metabase to MySQL.
Apache Airflow
The first thing we have to do is run all the services as Docker containers. For this, we will use the official Airflow image. We have to first install all the necessary libraries and packages into the Airflow container. For that, we have to create a Dockerfile.
# Use the Apache Airflow 2.7.1 image as the base image
FROM apache/airflow:2.7.1
# Switch to the "airflow" user
USER airflow
# Install pip
RUN curl -O 'https://bootstrap.pypa.io/get-pip.py' && \
    python3 get-pip.py --user
# Install libraries from requirements.txt
COPY requirements.txt /requirements.txt
RUN pip install --user -r /requirements.txt
This Dockerfile will be used to install the pip command first. Then, it will install all the necessary libraries in the requirements.txt file so that we won’t get an import error in the future. We will use this Dockerfile to build a container install-requirements.
After creating the Dockerfile, we can follow the instructions that this link provides us. After completing all the instructions, we will have a docker-compose.yaml file locally.
After obtaining the docker-compose file, we are going to modify that before starting the services. The first thing we have to do is add the following container under the services section.
install-requirements:
    <<: *airflow-common
    container_name: install-requirements
    build:
      context: .
    volumes:
      - ./requirements.txt:/requirements.txt
    depends_on:
      - postgres
      - redis
    networks:
      - all-network
This will be the container that will install all the necessary dependencies inside the Airflow container.
Apache Kafka
docker-compose.yaml will also create a multi-node (3) Kafka cluster. We have to add the following services to the docker-compose file that we obtained from the official Airflow page.
  zoo1:
    image: confluentinc/cp-zookeeper:7.3.2
    ports:
      - "2181:2181"
    environment:
      ZOOKEEPER_CLIENT_PORT: 2181
      ZOOKEEPER_SERVER_ID: 1
      ZOOKEEPER_SERVERS: zoo1:2888:3888
    networks:
      - kafka-network
      - all-network

  kafka1:
    image: confluentinc/cp-kafka:7.3.2
    ports:
      - "9092:9092"
      - "29092:29092"
    environment:
      KAFKA_ADVERTISED_LISTENERS: INTERNAL://kafka1:19092,EXTERNAL://${DOCKER_HOST_IP:-127.0.0.1}:9092,DOCKER://host.docker.internal:29092
      KAFKA_LISTENER_SECURITY_PROTOCOL_MAP: INTERNAL:PLAINTEXT,EXTERNAL:PLAINTEXT,DOCKER:PLAINTEXT
      KAFKA_INTER_BROKER_LISTENER_NAME: INTERNAL
      KAFKA_ZOOKEEPER_CONNECT: "zoo1:2181"
      KAFKA_BROKER_ID: 1
      KAFKA_LOG4J_LOGGERS: "kafka.controller=INFO,kafka.producer.async.DefaultEventHandler=INFO,state.change.logger=INFO"
      KAFKA_AUTHORIZER_CLASS_NAME: kafka.security.authorizer.AclAuthorizer
      KAFKA_ALLOW_EVERYONE_IF_NO_ACL_FOUND: "true"
    networks:
      - kafka-network
      - all-network

  kafka2:
    image: confluentinc/cp-kafka:7.3.2
    ports:
      - "9093:9093"
      - "29093:29093"
    environment:
      KAFKA_ADVERTISED_LISTENERS: INTERNAL://kafka2:19093,EXTERNAL://${DOCKER_HOST_IP:-127.0.0.1}:9093,DOCKER://host.docker.internal:29093
      KAFKA_LISTENER_SECURITY_PROTOCOL_MAP: INTERNAL:PLAINTEXT,EXTERNAL:PLAINTEXT,DOCKER:PLAINTEXT
      KAFKA_INTER_BROKER_LISTENER_NAME: INTERNAL
      KAFKA_ZOOKEEPER_CONNECT: "zoo1:2181"
      KAFKA_BROKER_ID: 2
      KAFKA_LOG4J_LOGGERS: "kafka.controller=INFO,kafka.producer.async.DefaultEventHandler=INFO,state.change.logger=INFO"
      KAFKA_AUTHORIZER_CLASS_NAME: kafka.security.authorizer.AclAuthorizer
      KAFKA_ALLOW_EVERYONE_IF_NO_ACL_FOUND: "true"
    networks:
      - kafka-network
      - all-network

  kafka3:
    image: confluentinc/cp-kafka:7.3.2
    ports:
      - "9094:9094"
      - "29094:29094"
    environment:
      KAFKA_ADVERTISED_LISTENERS: INTERNAL://kafka3:19094,EXTERNAL://${DOCKER_HOST_IP:-127.0.0.1}:9094,DOCKER://host.docker.internal:29094
      KAFKA_LISTENER_SECURITY_PROTOCOL_MAP: INTERNAL:PLAINTEXT,EXTERNAL:PLAINTEXT,DOCKER:PLAINTEXT
      KAFKA_INTER_BROKER_LISTENER_NAME: INTERNAL
      KAFKA_ZOOKEEPER_CONNECT: "zoo1:2181"
      KAFKA_BROKER_ID: 3
      KAFKA_LOG4J_LOGGERS: "kafka.controller=INFO,kafka.producer.async.DefaultEventHandler=INFO,state.change.logger=INFO"
      KAFKA_AUTHORIZER_CLASS_NAME: kafka.security.authorizer.AclAuthorizer
      KAFKA_ALLOW_EVERYONE_IF_NO_ACL_FOUND: "true"
    networks:
      - kafka-network
      - all-network

  kafka-connect:
    image: confluentinc/cp-kafka-connect:7.3.2
    ports:
      - "8083:8083"
    environment:
      CONNECT_BOOTSTRAP_SERVERS: kafka1:19092,kafka2:19093,kafka3:19094
      CONNECT_REST_PORT: 8083
      CONNECT_GROUP_ID: compose-connect-group
      CONNECT_CONFIG_STORAGE_TOPIC: compose-connect-configs
      CONNECT_OFFSET_STORAGE_TOPIC: compose-connect-offsets
      CONNECT_STATUS_STORAGE_TOPIC: compose-connect-status
      CONNECT_KEY_CONVERTER: org.apache.kafka.connect.storage.StringConverter
      CONNECT_VALUE_CONVERTER: org.apache.kafka.connect.storage.StringConverter
      CONNECT_INTERNAL_KEY_CONVERTER: "org.apache.kafka.connect.json.JsonConverter"
      CONNECT_INTERNAL_VALUE_CONVERTER: "org.apache.kafka.connect.json.JsonConverter"
      CONNECT_REST_ADVERTISED_HOST_NAME: 'kafka-connect'
      CONNECT_LOG4J_ROOT_LOGLEVEL: 'INFO'
      CONNECT_LOG4J_LOGGERS: 'org.apache.kafka.connect.runtime.rest=WARN,org.reflections=ERROR'
      CONNECT_PLUGIN_PATH: '/usr/share/java,/usr/share/confluent-hub-components'
    networks:
      - kafka-network
      - all-network

  schema-registry:
    image: confluentinc/cp-schema-registry:7.3.2
    ports:
      - "8081:8081"
    environment:
      SCHEMA_REGISTRY_KAFKASTORE_BOOTSTRAP_SERVERS: kafka1:19092,kafka2:19093,kafka3:19094
      SCHEMA_REGISTRY_HOST_NAME: schema-registry
      SCHEMA_REGISTRY_LISTENERS: http://0.0.0.0:8081
    networks:
      - kafka-network
      - all-network

  kafka-ui:
    container_name: kafka-ui
    image: provectuslabs/kafka-ui:latest
    ports:
      - 8888:8080
    depends_on:
      - kafka1
      - kafka2
      - kafka3
      - schema-registry
      - kafka-connect
    environment:
      KAFKA_CLUSTERS_0_NAME: local
      KAFKA_CLUSTERS_0_BOOTSTRAPSERVERS: PLAINTEXT://kafka1:19092,PLAINTEXT_HOST://kafka1:19092
      KAFKA_CLUSTERS_0_SCHEMAREGISTRY: http://schema-registry:8081
      KAFKA_CLUSTERS_0_KAFKACONNECT_0_NAME: connect
      KAFKA_CLUSTERS_0_KAFKACONNECT_0_ADDRESS: http://kafka-connect:8083
      DYNAMIC_CONFIG_ENABLED: 'true'
    networks:
      - kafka-network
      - all-network
Once we run the container, we can wait a bit and access the Kafka UI via localhost:8888. We can define the replication factor as 3 since there are 3 nodes (kafka1, kafka2, kafka3) while creating a new Kafka topic. We should only run:
docker-compose up -d --build
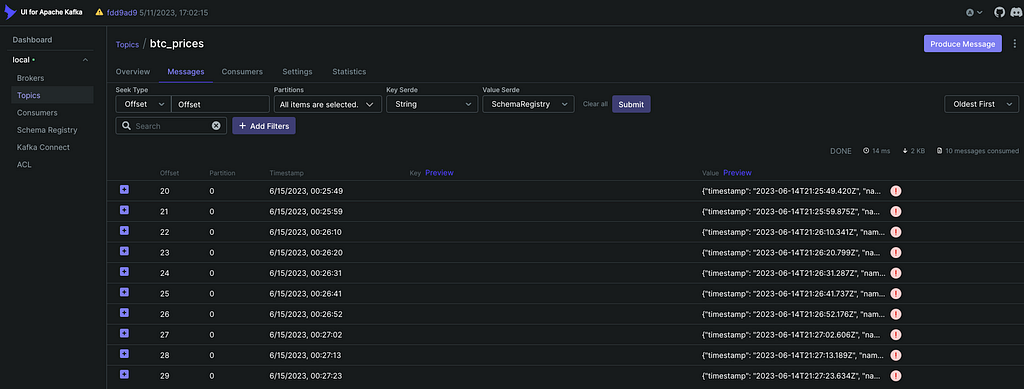
After accessing Kafka UI, we can create the topic btc_prices. Then, we can see the messages coming to the Kafka topic. All these are going to happen after running the whole project (after running the DAGs for example).
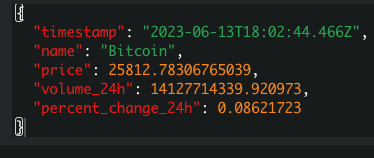
Even though the first Python script will be running as a task of the Airflow DAG in the end, I would like to introduce the script now. We should retrieve data from the Crypto API and write the data to the Kafka topic.
First of all, we have to import the necessary libraries and define the logger so that we will keep track of logs better.
import os
import time
import requests
import json
import logging
from kafka import KafkaProducer

logging.basicConfig(level=logging.INFO,
                    format='%(asctime)s:%(funcName)s:%(levelname)s:%(message)s')
logger = logging.getLogger("crypto_data_stream")
The following part will be sending the retrieved data to the Kafka topic.
def process_and_send_data(producer, data, symbol, topic):
    """
    Modifies the data and sends it to the topic
    """
    price_data = data['data'][symbol]['quote']['USD']

    extracted_data = {
        'timestamp': data['status']['timestamp'],
        'name': data['data'][symbol]['name'],
        'price': price_data['price'],
        'volume_24h': price_data['volume_24h'],
        'percent_change_24h': price_data['percent_change_24h']
    }
    producer.send(topic, json.dumps(extracted_data).encode('utf-8'))
This method will retrieve the data from the API and create a Kafka producer.
def data_stream():
    """
    Gets the data from the API and sends it to Kafka producer
    """
    try:
        api_key = os.environ.get("COINMARKETCAP_API_KEY")
    except:
        logger.error(f"API key couldn't be obtained from the os.")

    producer = KafkaProducer(bootstrap_servers=['kafka1:19092', 'kafka2:19093', 'kafka3:19094'])

    url = 'https://pro-api.coinmarketcap.com/v1/cryptocurrency/quotes/latest'
    parameters = {
        'symbol': 'BTC',
        'convert': 'USD'
    }
    headers = {
        'Accepts': 'application/json',
        'X-CMC_PRO_API_KEY': api_key
    }

    end_time = time.time() + 120 # the script will run for 2 minutes
    while True:
        if time.time() > end_time:
            break

        response = requests.get(url, headers=headers, params=parameters)
        data = json.loads(response.text)

        process_and_send_data(producer, data, 'BTC', 'btc_prices')

        time.sleep(10)

    logger.info("API data sent to Kafka successfully")
MySQL
docker-compose.yaml will also create a MySQL server and phpMyAdmin to visualize the database table btc_prices. Every env variable is located in docker-compose.yaml. I also defined them in the scripts.
db:
    image: mysql:8.0
    container_name: mysql
    restart: always
    environment:
      MYSQL_DATABASE: mysql
      MYSQL_USER: mysql
      MYSQL_PASSWORD: mysql
      MYSQL_ROOT_PASSWORD: mysql
    ports:
      - '3306:3306'
    volumes:
      - my-db:/var/lib/mysql
    networks:
      - all-network

phpmyadmin:
    image: phpmyadmin/phpmyadmin:latest
    container_name: metabase_pma
    links:
      - db
    environment:
      PMA_HOST: db
      PMA_PORT: 3306
      PMA_ARBITRARY: 1
    restart: always
    ports:
      - 8185:80
    networks:
      - all-network

volumes:
  my-db:
By running the following command, we can access to MySQL server. You will be prompted with the password after running.
docker exec -it mysql mysql -u mysql -p
You may also take a look at the below article to have more information about local MySQL server connection.
How to Create Database, User, and Access to MySQL
After access, we can run the following commands and see that the Kafka topic messages are inserted into the MySQL table successfully.
SHOW databases;
USE mysql;
SHOW tables;
select * from btc_prices;

Alternatively, we can access MySQL UI (phpMyAdmin) localhost:8185 and run SQL queries on btc_prices. This is a more comfortable way of retrieving data from the MySQL database. I will be using this way.
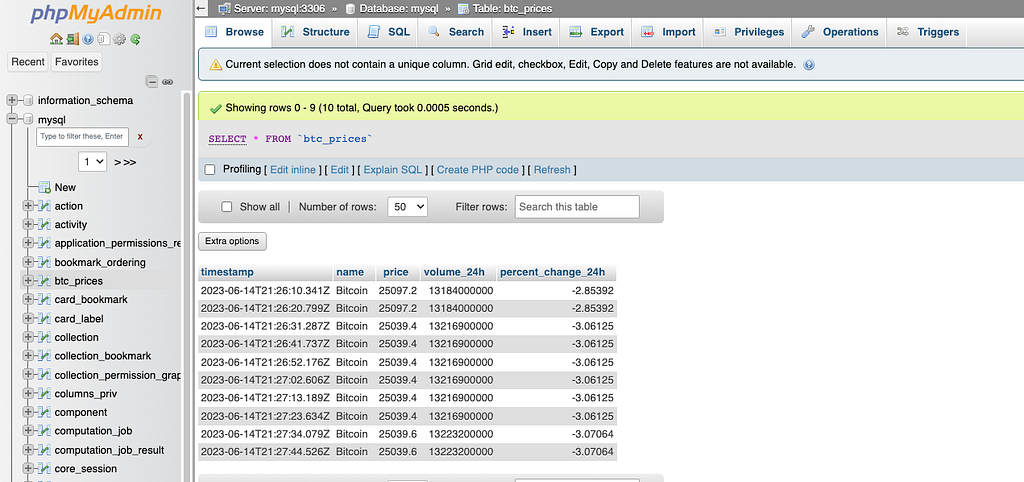
We have created the Kafka topic and set up the MySQL server. Even though we will be running the scripts as Airflow DAGs, I would like to introduce the necessary parts here.
First of all, we have to import the necessary libraries and define the logger again.
import mysql.connector
import logging
import json
import time
from kafka import KafkaConsumer

logging.basicConfig(level=logging.INFO,
                    format='%(asctime)s:%(funcName)s:%(levelname)s:%(message)s')
logger = logging.getLogger("read_kafka_write_mysql")
We will connect to MySQL and Kafka with these blocks:
try:
    conn = mysql.connector.connect(
        host="mysql",
        database="mysql",
        user="mysql",
        password="mysql",
        port=3306
    )
    cur = conn.cursor()
    logger.info('MySQL server connection is successful')
except Exception as e:
    logger.error(f"Couldn't create the MySQL connection due to: {e}")

try:
    consumer = KafkaConsumer(
        'btc_prices',
        bootstrap_servers=['kafka1:19092', 'kafka2:19093', 'kafka3:19094'],
        auto_offset_reset='latest',  # Start consuming from the latest offset
        enable_auto_commit=False  # Disable auto-commit to have manual control over offsets
    )
    logger.info("Kafka connection successful")
except Exception as e:
    logger.error(f"Kafka connection is not successsful. {e}")
We have to first create the necessary table in the MySQL database. We will be writing the data into this table later.
def create_new_tables_in_mysql():
    """
    Creates the btc_prices table in MySQL server.
    """
    try:
        cur.execute("""CREATE TABLE IF NOT EXISTS btc_prices
        (timestamp VARCHAR(50), name VARCHAR(10), price FLOAT, volume_24h FLOAT, percent_change_24h FLOAT)""")
        logging.info("Table created successfully in MySQL server")
    except Exception as e:
        logging.error(f'Tables cannot be created due to: {e}')
Last but not least, we will send the data coming from the Kafka topic to MySQL for 2 minutes straight. Only newly coming data will be sent.
def insert_data_into_mysql():
    """
    Insert the latest messages coming to Kafka consumer to MySQL table.
    """
    end_time = time.time() + 120 # the script will run for 2 minutes
    for msg in consumer:
        if time.time() > end_time:
            break

        kafka_message = json.loads(msg.value.decode('utf-8'))
        try:
            # Create an SQL INSERT statement
            insert_query = f"INSERT INTO btc_prices (timestamp, name, price, volume_24h, percent_change_24h) VALUES (%s, %s, %s, %s, %s)"
            cur.execute(insert_query, (kafka_message['timestamp'], kafka_message['name'], kafka_message['price'], kafka_message['volume_24h'], kafka_message['percent_change_24h']))
            conn.commit()
        except Exception as e:
            logging.error(f"Error inserting data: {e}")

    logger.info("Data coming from Kafka topic inserted successfully to MySQL.")
Running DAGs
So far, we have created the Kafka topic, got MySQL database and table ready and we have all the necessary scripts. We should move all .py scripts under the dags folder in the repo. The following dag script will be used to create the DAG and we will be able to see that in the UI.
from datetime import timedelta
from airflow import DAG
from airflow.operators.python_operator import PythonOperator
from datetime import datetime
from crypto_data_stream import data_stream
from read_kafka_write_mysql import create_new_tables_in_mysql, insert_data_into_mysql

start_date = datetime(2018, 12, 21, 12, 12)

default_args = {
    'owner': 'airflow',
    'start_date': start_date,
    'retries': 1,
    'retry_delay': timedelta(seconds=5)
}

with DAG('crypto_data_stream', default_args=default_args, schedule_interval='*/10 * * * *', catchup=False) as dag:


    data_stream_task = PythonOperator(
    task_id='data_stream',
    python_callable=data_stream,
    dag=dag,
    )

    create_new_tables_in_mysql_task = PythonOperator(
    task_id='create_new_tables_in_mysql',
    python_callable=create_new_tables_in_mysql,
    dag=dag,
    )

    insert_data_into_mysql_task = PythonOperator(
    task_id='insert_data_into_mysql',
    python_callable=insert_data_into_mysql,
    dag=dag,
    )

    data_stream_task

    create_new_tables_in_mysql_task >> insert_data_into_mysql_task
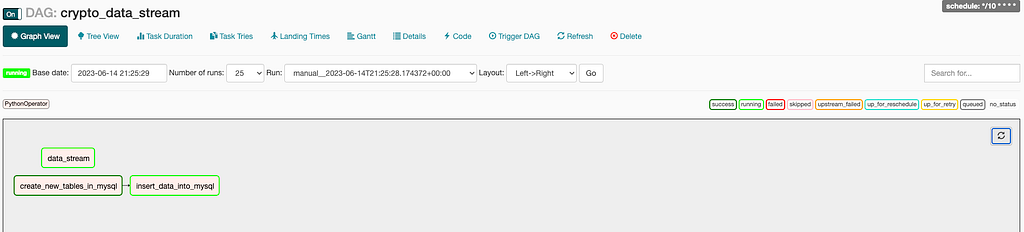
Then, we can see that crypto_data_stream appears on the DAGS page.

When we turn the OFF button to ON, we see that the data will be sent to the Kafka topic every 10 seconds and written to the MySQL table in parallel. We can also check whether the data is sent successfully from the Kafka UI.
Metabase
Since we already sent the data to MySQL, we can now start creating dashboards in Metabase. Metabase also runs as a Docker container using docker-compose.yaml.
  metabase-app:
    image: metabase/metabase
    container_name: metabase
    restart: always
    ports:
      - 3000:3000
    volumes:
      - ./metabase-data:/metabase-data
    environment:
      MB_DB_TYPE: mysql
      MB_DB_DBNAME: mysql
      MB_DB_PORT: 3306
      MB_DB_USER: mysql
      MB_DB_PASS: "mysql"
      MB_DB_HOST: mysql
    depends_on:
      - db
    links:
      - db
    networks:
      - all-network
We can access it via localhost:3000. Once we access the UI, we have to configure the MySQL database according to the env variables defined in docker (MySQL env variables). Then, we can see that the MySQL data appears on Metabase if we query:
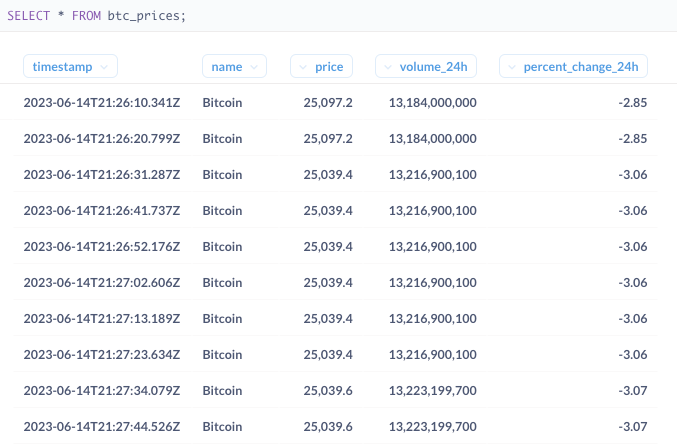
After seeing that the data appears correctly, we can create dynamic dashboards with the desired data. If we set the auto-refresh to 1 minute, the dashboard refreshes itself every 1 minute, and new data arrives every 10 seconds to the MySQL table.
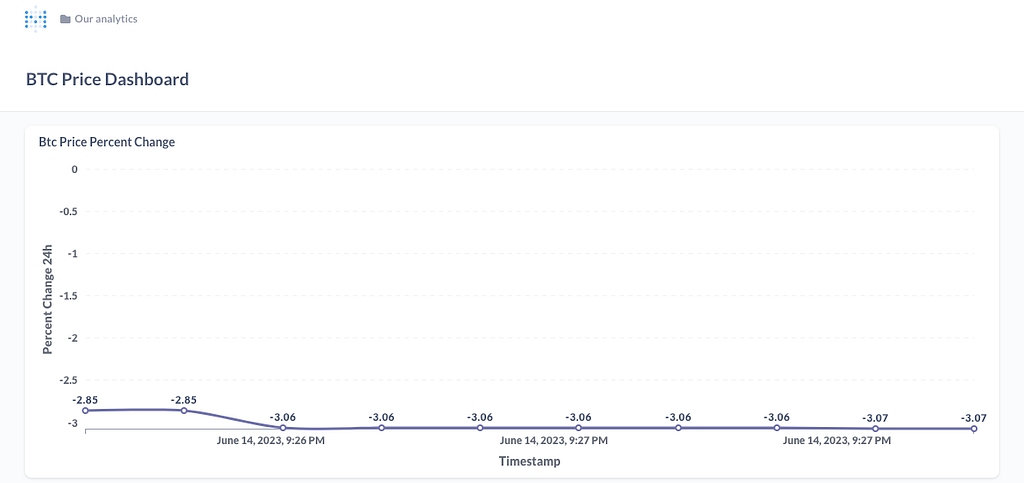
In the end, we have a real-time dashboard that shows the real-time BTC price data in Metabase. We can monitor the data via our local machine. We can modify how long the data will be retrieved (3 minutes for this specific project).
If you’re looking for freelance or consultancy work on data pipelines, AI systems, or real-time platforms, reach out to me on X, or via email.
And, if this saved you time or sparked an idea, consider sponsoring me on GitHub. Thank you!
GitHub: https://github.com/dogukannulu
Email: dogukannulu@gmail.com